Basics
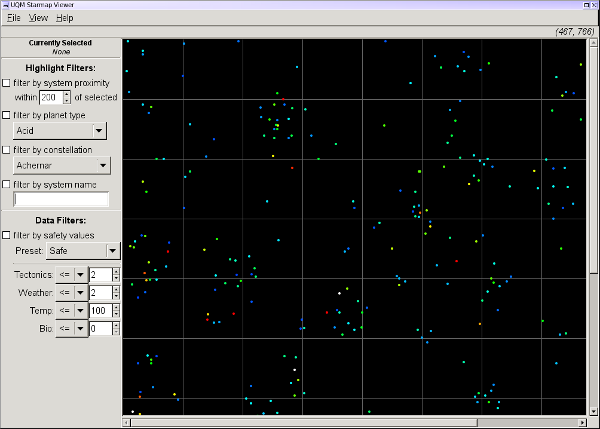
The basic usage of the application should be pretty straightforward. Above is the main screen. You can click-and-drag to move the map around if your window isn't large enough to fit the entire map. One thing which may not be immediately apparent is the coloring of the stars. You may note that they don't correspond with the colors used in the starmap in Ur-Quan Masters. This application colors systems based on how lucrative it judges the system to be, based on some parameters you can adjust using the controls on the left. The least-lucrative systems will be in blue, and the quality just moves up the color spectrum: through cyan, green, yellow, orange, and red. Breaking from the color spectrum a bit, the very best systems will be drawn in white. Note that if you've selected a system by clicking on it, that system will be white as well, but enlarged, to differentiate it from the other stars.
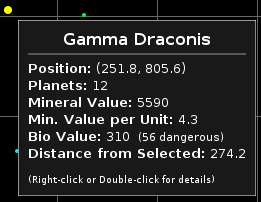
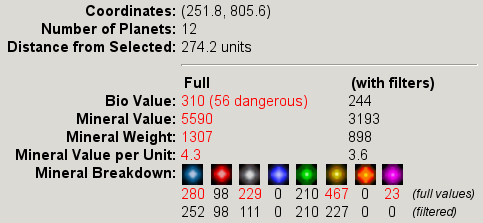
Moving your mouse over a system will bring up a popup of data about the system:
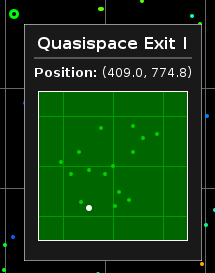
Note that if you're showing quasispace exits, most of the popup will just be a little map of quasispace with the associated portal highlighted.
The mineral value is the total RU of minerals which that system can produce, assuming your lander is capable of cleaning out the system. The "Mineral Value per Unit" field, which you'll see as "MVpU" elsewhere, determines the average RU that you'll get from a single slot in your cargo holds. For instance, if the 5590 RU listed in this example popup would have been all Common Metals, the MVpU would be "1" since it would take 5590 total cargo space to get that 5590 RU back to Starbase. As it is, this system has a high percentage of Precious and Rare minerals, so you get more "bang for your buck," so to speak. In general, a higher MVpU is preferrable to a lower one.
The "Bio" field up there lets you know the total number of biological units that can be found in the system, and how many of those are deemed "dangerous," which is essentially biological life which will actively seek out and attack your lander. The method I used to determine which organisms were dangerous was pretty fuzzy and may need some tweaking later, so let me know if it seems off.
As the popup text mentions, either double-clicking or right-clicking on the system will bring up detailed information about the system, including information about each planet. See the screenshots page for the full window. The main block of system information is below:
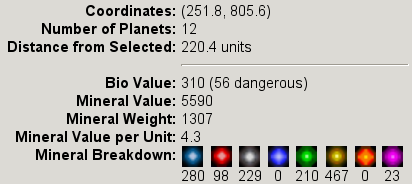
Note that the total "weight" of the minerals in this system is 1307, so that's how much cargo space you'd need to clean out this system in a single go. If you divide the mineral value by the mineral weight, you'll end up with that MVpU measurement mentioned above. You'll also see that you get a total count of minerals by type. Note that the breakdown is by weight, not value - the Exotic Minerals in this system will take 23 spots in your cargo holds (but would be worth a total of 575 RU).
Underneath that summary, you'll get a table with detailed information about each planet. You can sort on any column by clicking on the header, and clicking again to reverse the sort order. Because there's so much data, a series of checkboxes will let you determine which columns to show:

"Environment" will toggle the Tectonics, Weather, Temperature, and Gravity columns. "Bio Data" will toggle the Bio and Dangerous Bio columns. "Mineral Summary" will toggle Value, Weight, and MVpU. "Mineral Details" will give you a breakdown of mineral types for each planet.
Viewing Options
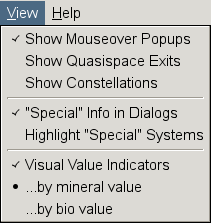
Back on the main screen, the "View" menu contains options which determine how data will be presented to you. The two options which deal with "special" systems are talking about basically any system which interacts with the plot directly, like homeworlds and locations of plot items.
- Show Mouseover Popups
- If you find the mouseover popups annoying, you can disable them here.
- Show Quasispace Exits
- Select this and you'll see all the quasispace exits on the map, as little green rings. The exits are selectable as well, so you can use the proximity filter (below) to find systems within a certain distance from an exit.
- Show Constellations
- This just draws the proper lines for the constellations. It doesn't have much purpose, though the plot contains a couple of clues for things which talk about the shapes of constellations, so this could be helpful for those situations.
- "Special" Info in Dialogs
- This is on by default, and will note the "special" information about a system in the popup dialogs and the system details window. If you don't want to ever see this information, be sure to uncheck this option.
- Highlight "Special" Systems
- If enabled, this will visually highlight all the special systems on the map. This could be seen as unwelcome by folks who just wanted to investigate mineral resources, so it's off by default.
- Visual Value Indicators
- This determines how the systems will be ranked, ie: it affects the color the various stars are drawn in. By default they're ranked by their mineral worth, but you can switch that to rank by biological specimens instead. Note that you can completely disable visual value indications by unchecking this box, in which case each star will just be displayed as white.
Filters
Highlighting Filters
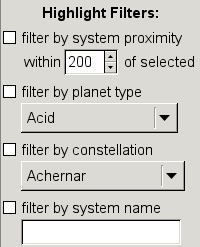
These filters determine which systems will be highlighted with the mineral/bio-value color scheme. One thing that's important to note is that the color spectrum is set based only on the systems which are set to be highlighted. A star which is only orange when the entire map is highlighted might be white when it's in a smaller pool of highlighted stars. An example is below:
One final note - due to the fact that these filters run off of checkboxes, you can use more than one at the same time. If you want to see only systems inside Camelopardalis which contain Alkali worlds, for instance, you're free to do so.
- filter by system proximity
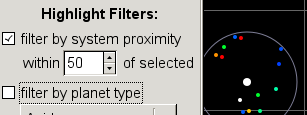
- This is pretty self-explanatory - once you've selected a system (by clicking on it), enable this filter to only highlight systems within the given range. This is useful if you have limited fuel resources and just want to know where the nearest lucrative systems are. Note that every ten distance units equals one unit of fuel. This is a good example of the changing color scheme:
Note that the previously-orange system is now white, indicating that it has the greatest mineral reserves within that radius, and two of the green stars are now rated at red.
(before filtering)
(after filtering)- filter by planet type
- This will highlight only systems which contain at least one planet of the given type. This filter isn't terribly useful really, but it's fun to play around with if you're curious. Remember that the color highlighting will change to rank only the systems which match your filter.
- filter by constellation
- If you want to know where a constellation is, this is a good way to highlight it against all the rest. The usual note about color ranking applies here as well.
- filter by system name
- If you'd like to search by system name, here's where you do it. The checkmark here is actually somewhat superfluous - if you type anything in and hit enter, the checkmark will automatically be enabled, and if you delete all the text in the box and hit enter, the checkmark will be disabled. One other important note is that if you have the "Special Info in Dialogs" option selected in the View menu, this text search will also search inside the special text. So finding homeworlds, for instance, is possible through this tool. Once again, the color highlighting is impacted by which systems match this filter.
Data Filters
... aaand I believe that should do it. Enjoy! Let me know if something's not clear, or you feel should work differently.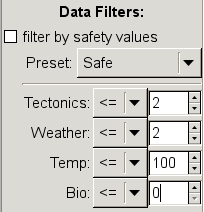
This is probably the most actually-useful bit of the application. A system might have 10k RU worth of resources, but if all those resources are on planets with thousand-degree temperatures and extreme tectonics and weather, and you're just starting out the game with the basic lander, it doesn't really matter to you. You can use this filter to automatically discard any planet from the color ranking which doesn't meet your criteria.
Tectonics, Weather, and Temp(erature) are pretty self-explanatory, but note that "Bio" actually refers to what the app considers to be dangerous. See my notes above in the "Basics" section for how the danger was assigned.
You're welcome to play around with the values yourself, of course, but I've also set up a few presets, which correspond roughly to the various stages of lander upgrades that you'll (ideally) acheive throughout the game. I've summarized them below.
Note: Let me know if some of the presets seem a bit wrong. I've only done one playthrough of the game while using this map.
- Safe
- Planets which should be completely safe for the basic lander. You should be able to land, leave your computer on while you head out for the weekend, come back, and not have lost any life. That's the idea, anyway.
- Reasonable
- This was actually supposed to be "Reasonably Safe" but that didn't fit lengthwise in the lefthand panel. Anyway, these are planets on which you could still probably do pretty well, given the default lander, though you'd want to be on your toes and watch out for spreading fires, erupting tectonic activity, etc.
- Lifeform
- One of the first upgrades you get for your lander is Lifeform resistance. The only difference between this and the "Reasonable" level is the effective removal of the biological filter.
- Earthquake, Lightning, Fire
- These three levels correspond to the next three upgrades you'll get on your lander. By the time you have heat resistance, you'll be more-or-less invulnerable.
- All
- This is a filter which will accept anything on the board, so it's effectively no different than simply turning the safety filter off entirely. I figured it may be a useful preset if you wanted to start with everything and then pare down, though, rather than working your way up from Safe.
Once you have a safety filter set, you'll notice the colors on the map adjust to the new parameters, and the mouseover popups will tell you what's been filtered:

The mineral details summary will be similarly updated. Values which have changed because of the filter will be highlighted in red.
Additionally, in the full planet details table, any planet which doesn't meet the current safety criteria will be highlighted in red text, to make it clear which planets aren't safe to land on. You can see an example of this on the screenshots page.